Honda Odyssey Owners Manual: Adjusting the Seat Positions
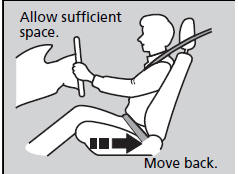
Adjust the driver's seat as far back as possible while allowing you to maintain full control of the vehicle. You should be able to sit upright, well back in the seat and be able to adequately press the pedals without leaning forward, and grip the steering wheel comfortably. The passenger's seat should be adjusted in a similar manner, so that it is as far back from the front airbag in the dashboard as possible. ■ Adjusting the front driver’s and passenger’s power seat(s)*
WARNING Always sit as far back from the front airbags as possible while maintaining control of the vehicle. The National Highway Traffic Safety Administration and Transport Canada recommend that drivers allow at least 10 inches (25 cm) between the center of the steering wheel and the chest. Always make seat adjustments before driving. Once a seat is adjusted correctly, rock it back and forth to make sure it is locked in position. ■ Adjusting the passenger’s manual seats
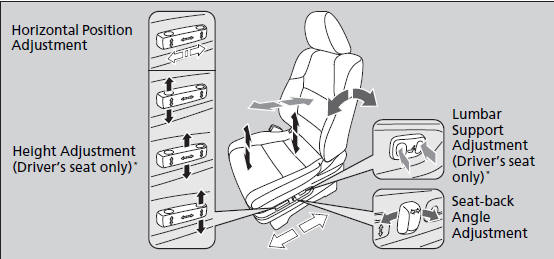
■Adjusting the Seat-Backs
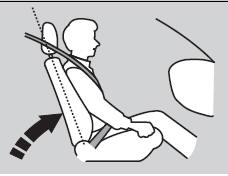
Adjust the driver's seat-back to a comfortable, upright position, leaving ample space between your chest and the airbag cover in the center of the steering wheel. The front seat passenger should also adjust their seat-back to a comfortable, upright position. Reclining a seat-back so that the shoulder part of the belt no longer rests against the occupant's chest reduces the protective capability of the belt. It also increases the chance of sliding under the belt in a crash and being seriously injured. The farther a seat-back is reclined, the greater the risk of injury. WARNING Adjust the seat-back to an upright position, and sit well back in the seat. Do not put a cushion, or other object, between the seat-back and your back. Doing so may interfere with proper seat belt or airbag operation. If you cannot get far enough away from the steering wheel and still reach the controls, we recommend that you investigate whether some type of adaptive equipment may help. ■Adjusting the Head Restraints
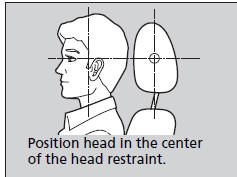
Your vehicle is equipped with head restraints in all seating positions. Head restraints are most effective for protection against whiplash and other rearimpact crash injuries when the center of the back of the occupant's head rests against the center of the restraint. The tops of the occupant's ears should be level with the center height of the restraint. WARNING Make sure head restraints are in place and positioned properly before driving. ■ Adjusting the front and second row outer and third row outer head restraint positions
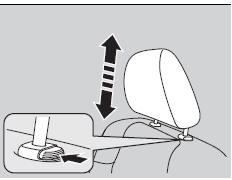
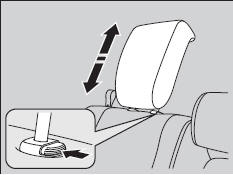
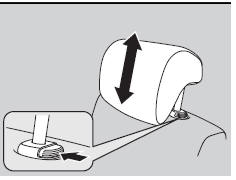
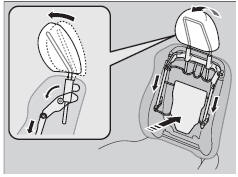
To raise the head restraint: Pull it upward. ■Changing the Second Row*/Third Row Center Seat Head Restraint Positions
A passenger sitting in the second row/third row center seating position should adjust the height of their head restraint to an appropriate position before the vehicle begins moving.
To raise the head restraint:
To lower the head restraint: ■Removing and Reinstalling the Head Restraints Head restraints can be removed for cleaning or repair.
To remove a head restraint:
To reinstall a head restraint: WARNING Always replace the head restraints before driving. To remove the third row seat outer head restraints, fold down the seat-back first. ■Maintain a Proper Sitting Position After all occupants have adjusted their seats and head restraints, and put on their seat belts, it is very important that they continue to sit upright, well back in their seats, with their feet on the floor, until the vehicle is safely parked and the engine is off. Sitting improperly can increase the chance of injury during a crash. For example, if an occupant slouches, lies down, turns sideways, sits forward, leans forward or sideways, or puts one or both feet up, the chance of injury during a crash is greatly increased. In addition, an occupant who is out of position in the front seat can be seriously or fatally injured in a crash by striking interior parts of the vehicle or being struck by an inflating front airbag. WARNING Always sit upright, well back in the seat, with your feet on the floor. ■Active Head Restraints The driver’s and front passenger’s seats have active head restraints. In a rear impact, an occupant properly secured by a seat belt will be pushed against the seat-back and the head restraint will move forward. This reduces the distance between the restraint and the occupant’s head, which helps reduce the likelihood of whiplash and injuries to the neck and upper spine.
In order for the active head restraints to operate
properly: After a collision, the activated restraint should return to its normal position. If the restraint does not return to its normal position, or in the event of a severe collision, have the vehicle inspected by a dealer. |


See More:
Honda Odyssey Service Manual > Doors: Sliding Door Latch Remote Control Assembly Replacement
NOTE: Put on gloves to protect your hands. Remove the door panel. Remove the latch remote control assembly (A) from the door. Disconnect the remote control assembly connectors (B). Release the cable holders (C), and disconnect the outer handle cable (D), the lower roller cable (E), the front latch c ...
Honda Odyssey Owners Manual
- Quick Reference Guide
- Safe Driving
- Instrument Panel
- Controls
- Features
- Driving
- Maintenance
- Handling the Unexpected
- Information
Honda Odyssey Service Manual
