Honda Odyssey Owners Manual: Operating the System
To operate the system, turn the ignition switch to ON
■ The audio from the front speakers switches to the audio played in the rear. If you do not operate the system from the front panel
for more than 20 seconds, the indicator in the
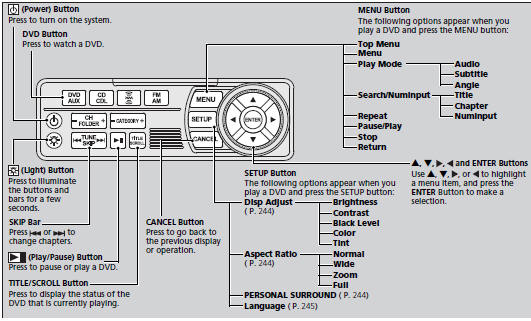
■System Controls and Menus for DVD
■ Playing a DVD ■ DVD setup from the front panel
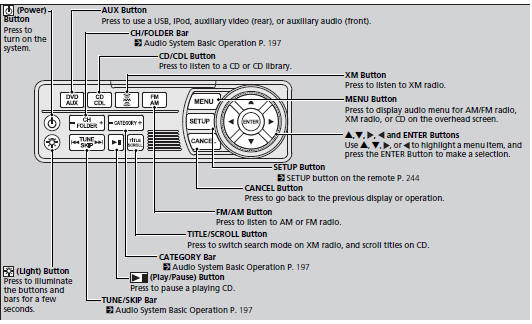
Press the
Setting up Audio:
Setting up Subtitle: DVD is available for the rear seat passenger only.
If you have turned off the Auto Play feature, press the
Auto Play On:
Title/Chapter Search:
■ TITLE/SCROLL button on the remote ■ MENU button on the remote
Press the MENU button while the DVD is playing to see the available options.
Use the Press the TITLE/SCROLL button again to return. Top Menu:
Menu:
Play Mode:
When the DVD is not playing If you press the MENU button while the DVD is not playing, the option Play Mode changes to Initial Settings. Initial Settings:
1. Select the language setting.
Initial Settings: Search:
1. Select NumInput to go to the number input screen.
Repeat: ■ SETUP button on the remote
Press the SETUP button while the DVD is playing to see the available options.
Use the Disp Adjust: After you make all the adjustments, the screen goes back to the top SETUP screen, or press the CANCEL button to return.
Aspect Ratio:
Personal Surround: Language: When the DVD is not playing You can select the audio language from English, French, and Spanish. Appearance: ■System Controls and Menus for Audio
■ Playing AM/FM radio in the rear When you press the MENU button while the radio is playing, the audio menu appears on the overhead screen. The available functions are the same as those of the front audio system. The TUNE/SKIP bar on the control panel works the same as the TUNE or SKIP bar on the front panel for AM/FM radio operation.
■ Playing XM radio in the rear When you press the MENU button while the radio is playing, the audio menu appears on the overhead screen. The available functions are the same as those of the front audio system. The TUNE/SKIP bar on the control panel works the same as the TUNE or SKIP bar on the front panel for XM radio operation. To change the mode between category and channel, press and hold the TITLE/ SCROLL button for five seconds. If you press the ■ Playing a CD, and CD Library The available options appear on the overhead screen are Repeat, Random, and Scan. These functions are the same as those of the front audio system. To scroll your audio data title, press the TITLE/SCROLL button for five seconds.
■ Playing iPod® and a USB flash drive The available options appear on the overhead screen are Repeat, Random, and Scan. These functions are the same as those of the front audio system. To scroll your audio data title, press the TITLE/SCROLL button for five seconds. If you press the You can also insert an audio CD compatible with the system, or recorded in MP3/WMA/AAC formats into the lower slot and play. The front passengers can listen to the same CD, or select another audio source. |
 or ACCESSORY
 . Press
the
. Press
the  button to turn on the system
(indicator on).
button to turn on the system
(indicator on).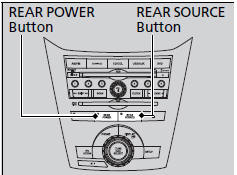
 (SEEK/SKIP) bar, and to reverse,
press and
hold the
(SEEK/SKIP) bar, and to reverse,
press and
hold the  bar on the front panel or
the remote.
bar on the front panel or
the remote. bar, and to go to the beginning of
the
current chapter, press the
bar, and to go to the beginning of
the
current chapter, press the  bar on
the front panel or the remote. Quickly press
the
bar on
the front panel or the remote. Quickly press
the  bar twice to go to the
previous chapter.
bar twice to go to the
previous chapter.
 button on the front
panel
while a DVD is playing and display REAR
MENU in front. Rotate
button on the front
panel
while a DVD is playing and display REAR
MENU in front. Rotate  to select
DVD
Setup, then press
to select
DVD
Setup, then press  .
. to select Audio, then
press
to select Audio, then
press  .
. to select a language for
audio that is available on the DVD, then press
to select a language for
audio that is available on the DVD, then press
 .
. to select Subtitle, then
press
to select Subtitle, then
press  .
. to select a subtitle
language that is available on the DVD.
to select a subtitle
language that is available on the DVD. (play) button on the front panel
or remote.
(play) button on the front panel
or remote.
 and
and
 buttons to highlight
the option and then press the ENTER button.
buttons to highlight
the option and then press the ENTER button.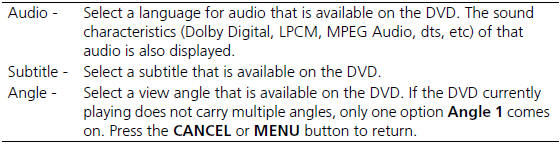


 and
and
 buttons to input numbers.
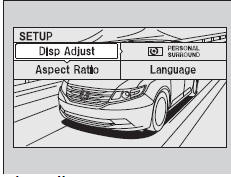
 button on the
front panel, you
can operate the rear entertainment system from the
front display.
button on the
front panel, you
can operate the rear entertainment system from the
front display.

See More:
Honda Odyssey Service Manual > Rearview: Rearview Mirror Replacement
Without Automatic Dimming Mirror Loosen the screw with a TORX T20 bit. Fastener Location? : Screw, 13/8-24 UNF 3.9 N·m (0.40 kgf·m, 2.9 lbf·ft)Apply thread lock. Slide the rearview mirror (A) rearward and off the mount (B). BA Install the mirror in the reverse order of removal, and apply medium s ...
Honda Odyssey Owners Manual
- Quick Reference Guide
- Safe Driving
- Instrument Panel
- Controls
- Features
- Driving
- Maintenance
- Handling the Unexpected
- Information
Honda Odyssey Service Manual
